Integrating Kamishibai Performance across the Curriculum
Integrating Kamishibai Performance across the Curriculum
Subject Areas:
English and Language Arts
Social Studies (or other content area)
Visual and Performing Arts
Grade Level: Elementary
Materials Required:
- Downloadable PDF of my article “The Mechanics of Kamishibai through the Art of Eigorō Futamata” www.kamishibai.com/resources
- Allen Say (2005) Kamishibai Man
- Images of Street-Performance kamishibai (from Eric Nash [2009] Manga Kamishibai or another source)
- Published kamishibai (I recommend “The Three Magic Charms” and “The Old Man and the Fox” for a start. Other recommendations appear at the end.)
- Kamishibai stage (It is also possible to make stages or perform without the stage, but the stage is well worth the investment.)
- Large paper for mapping out stories (2 per group)
- 5 X 7 index cards for practicing movement ideas (It is also possible to have students make miniature stages [see appendices of The Kamishibai Classroom for instructions]and create their stories on 5 X 7 index cards, but the final performances are much more satisfying on the large, standard sized cards.)
- 10 ½ X 15 inch cards (matt poster-board or oaktag) for finished cards
- Pencils, erasers, black markers for bold outlining, and colored pens or crayons for coloring.
Time/Periods: Six 50-minute periods
Background Information:
As my article, “The Many Faces of Kamishibai: Past, Present, and Future,” demonstrates, kamishibai can be used to teach about Japanese history, literature, and culture, but it is not limited to topics relating to Japan. Kamishibai stories have been developed to cover any topic or genre. Like a Power Point presentation or digital film, kamishibai offers a versatile format for students to publicly present almost any kind of research. As I often tell my students, any story that would make a good movie would make a good kamishibai because kamishibai are, in essence, hand-manipulated movies.
One of the great strengths of kamishibai as an oral/visual storytelling form is that it provides an opportunity for students to put whatever research or reading they are doing into their own words in performance. Very often teachers struggle (even at the college level!) to help students to come up with their own language for what they have researched (see CCRA.W.8 below), but, if a student translates what they have learned into a visual, oral, and gestural medium in performance, they are no longer relying on text alone. As I show below, and as I have argued elsewhere[1], kamishibai offers a uniquely concrete format to teach students how to build narrative tension and make any story they want to tell exciting.
Before students can transform their knowledge into dramatic storytelling, however, they need to understand what I call the mechanics of kamishibai.[2] That is, how to use the various pulling and illustration techniques to develop suspense and narrative tension that will keep their audiences at the edge of their seats, wanting to hear more. Stories that involve action or drama are more likely to make interesting kamishibai narratives.
Learning Goals/Objectives: Develop narrative tension in performance and integrate content knowledge into a new format.
Common Core Curriculum Standards:
Speaking and Listening Standards:
CCRA.SL.1 Prepare for and participate effectively in a range of conversations and collaborations with diverse partners, building on other’s ideas and expressing their own clearly and persuasively
CCRA.SL.2 Integrate and evaluate information presented in diverse media and formats, including visually, quantitatively, and orally
CCRA.SL.3 Evaluate a speaker’s point of view, reasoning, and use of evidence and rhetoric
CCRA.SL.4 Present information, findings, and supporting evidence such that listeners can follow the line of reasoning, and the organization, development, and style are appropriate to task, purpose, and audience
CCRA.SL.5 Make strategic use of digital and visual displays of data to express information and enhance understanding of presentations
CCRA.SL.6 Adapt speech to a variety of contexts and communicative tasks, demonstrating command of formal English when indicated or appropriate
Reading Standards:
CCRA.R.7 Integrate and evaluate content presented in diverse media and formats, including visually and quantitatively, as well as in words[3]
Writing Standards:
CCRA.W.3 Write narratives to develop real or imagined experiences or events using effective technique, well-chosen details, and well-structured event sequences
CCRA.W.5 Develop and strengthen writing as needed by planning, revising, editing, rewriting, or trying a new approach
CCRA.W.6 Use technology, including the Internet (or, in this case, kamishibai) to produce and publish (perform) writing and to interact and collaborate with others
CCRA.W.8 Gather relevant information from multiple print and digital sources, assess the credibility and accuracy of each source, and integrate the information while avoiding plagiarism
Essential Question: How can knowledge about a topic be integrated effectively into a dramatic visual-narrative format?
Procedure:
Day 1: Introduce Kamishibai as a format
Read Allen Say’s Kamishibai Man (2005)
Talk about how television replaced kamishibai and ask students to think about any TV programs they watch daily. What makes them want to keep watch these shows day after day? What techniques do the directors use to make them want to come back for more? (If they haven’t thought about this, ask them to pay attention in the weeks ahead and report back!)
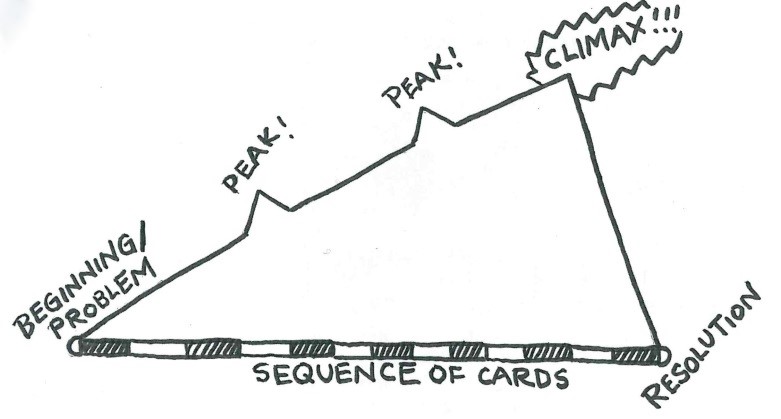
Read the afterword to Allen Say’s book, where I present a brief history of kamishibai, and discuss benshi or the practice of film narration. Show the student selected images from Eric Nash’s Manga Kamishibai. Pick images that show how Street- Performance kamishibai stories were as exciting as television shows students watch today. Then explain that the storytellers had certain techniques that ensured that their audiences would come back to buy more candy the following day. They would end the episode on a “cliff-hanger” (or peak) in the story and then say, “To be continued…”
What is a cliff-hanger? A story that leaves you hanging at one of the peaks or at the climax of story structure (see below). The climax is literally a cliff!
Demonstrate a kamishibai story by performing “The Three Magic Charms” ( Miyoko Matsutani and Eigorō Futamata)—How does the artist achieve suspense? What are the peaks of excitement in the story? What does the artist do at the climax?
- Partial Pulling Technique (Card 5 to 6)
- Fast pulling technique for transformations (Cards 14 to 15 to 16) [4]
Also point out some of the defining characteristics of kamishibai illustrations (From “The Mechanics of Kamishai through the Art of Eigorō Futamata”). To list them briefly here:
- Centrality of image on the card (even in the chasing scenes, characters are depicted in the center!)
- Direction of movement out of the stage from right to left (again, the chasing scenes)
- Large illustrations to be seen from a distance and no speech bubbles (the storytellers will make all sound effects and dialogue, just like the soundtrack for a film)
Day 2:
Review the narrative structure diagram. Read Pat Hutchins’ Rosie’s Walk (1966), without showing the images. Ask the students if it is an exciting story? (Definitely not!) Then show them the images. Why do the images make the story more exciting? (Because the fox, who is not mentioned in the written version of the story, could eat Rosie at any moment. The words and images are doing totally different parts of the storytelling!)
Demonstrate kamishibai story: “The Old Man and the Fox” (Miyoko Matsutani and Eigorō Futamata)—Where are the peaks in this story and where is the climax?
Zooming in Technique (Cards 9, 10, and 11)
Show the panning (or zooming) in and out technique at the climax. Make sure that the students notice how many cards it took the artist to make it to the climax (somewhere between the 9th and 11th card in the 12-card kamishibai.[5] A good rule of thumb is that one episode of a street-performance kamishibai was usually 10 cards, and they usually ended on a cliffhanger [i.e., the climax] so students should think about giving themselves about 10 cards to lead up to their climax)
Where have students seen that before? Movies. Can movies be made about any topic? Of course! Tell the students that they will be making their own movies in miniature by performing their own kamishibai stories. Divide them into groups of six or seven students.
---
At this point, the content of the stories the students develop depends on the teacher’s other teaching demands. If myths or folktales are part of the curriculum, then the students could make myth or folktale kamishibai. If students are learning about the Civil Rights movement, for example, they could create a historical kamishibai based on those events leading up to the vote. If biography is something the students are required to do, they could create kamishibai biographies about famous people. If they are in a health class, they could create kamishibai on the risks of smoking or the importance of hygiene (both topics I have seen done in kamishibai format by students in Japanese schools). Prior to and/or during the introduction of kamishibai, students could be doing reading and research about these topics so they will be ready to transmediate what they know into the kamishibai format. This invites teachers to integrate their instruction in literacy with other content areas.
---
In this curriculum, I will use an example that was inspired by an incident in Chapter Two of my book, Performing Kamishibai: An Emerging New Literacy for a Global Audience. One of the teachers I worked with was in the midst of doing biographies with his third graders when I began my kamishibai project in his classroom. The students had researched their chosen famous or important figure, reading biographies in picture-book format and articles on the Internet. At the point that I entered the classroom, they were supposed to be wrapping up their writing, but the students were struggling with how to write their biographies in their own words. Having just read text by a lot of other people, they were finding it hard to avoid copying what they had read!
If I had entered the classroom earlier in the year, I would have had them create group kamishibai biographies, starting by identifying a central conflict or unachieved goal for the character at the beginning of the story. The peaks of excitement, leading up to the climax, would be chosen from significant events in that figure’s life, and the resolution at the end would be the achievement or inability to achieve that goal.
Although I did not have an opportunity to do biographies with that class of third-graders, I did later create my own kamishibai biography about a little-known aspect of the life of Thomas Jefferson that I can use as an example here. The title: “A Bone to Pick with Buffon: A True Story about Thomas Jefferson.”
I began the process by identifying a conflict: Jefferson spent many years of his life trying to change the mind of the influential French naturalist (Georges-Louis Leclerc, Count of Buffon, 1707-1788), who argued that America was too cold and damp for any animal species to thrive. Buffon said that all species, including humans, became smaller and weaker when they moved to America.
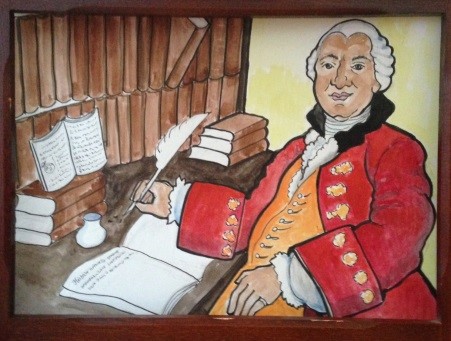
Then I identified some peaks: Ever the patriot, Jefferson was insulted by Buffon’s ideas and wanted to prove Buffon wrong. He began by pointing out the bones of the Mammoth that had been found in Kentucky, and he later tried to prove that a giant claw, which had been found in Virginia, belonged to a great American lion (It actually turned out to be the claw of a sloth!).
Climax: He even went so far as to have men hunt for the largest moose they could find in Vermont, and he sent the moose in a crate--bones, hide, antlers and all--to Buffon!
(To build suspense at the climax, I made this illustration a half-pull card so the audience first sees Jefferson presenting Buffon with a moose, and then, when I pull back the rest of the card, they see Buffon’s grave!)
Resolution: Sadly, we will never know if Jefferson succeeded in his quest because Buffon died before he could revise his opinions.
Day 3-4:
Once the groups have settled on their chosen or assigned topic, they will identify (1) A conflict or unachieved goal (2) The peaks of excitement in their story (3) The climax (4) The resolution.
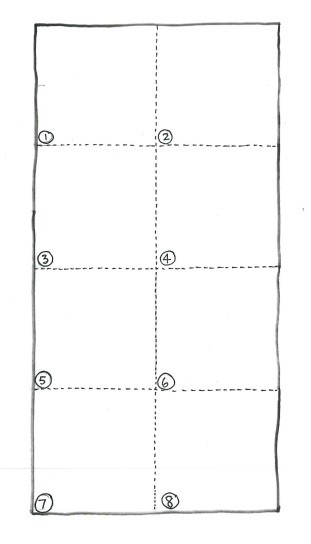
As soon as they are ready, they will begin mapping their story out on a large piece of paper, folded into eight segments (see below)[6] to determine the sequence of their narrative.
Once they have finished mapping out their story, they will split up to perform different roles. Two students can be the draftsmen (sketching the images on the cards), two will be responsible for bold outlining, and two will do the coloring in of the images.
Day 5:
By this point, all the groups should have cards that they can perform in the stage (or outside the stage, if necessary). They should choose someone from the group to manipulate the cards and someone to be the recorder to take notes. As they try out their cards in the stage, they will come up with dialogue, sound effects, and use narrator’s voice where appropriate. The recorder will take down their ideas in writing. Remember: The text for Card One goes on the back of the last card, so the storyteller can see it. The text for Card Two goes on the back of Card One. The text for Card Three goes on the back of Card Two, and so on.
Day 6:
They will spend the first half of the session practicing and finishing up their stories. To get all the students involved, it is possible for them to assign roles to each member of the group so that one person manipulates the cards, one person is the narrator, one or more can be characters doing the dialogue, and one or two can be responsible for sound effects or music. Depending on how many group stories there are, the last half hour or so should be set aside for the performance.
Once a class has created sets of kamishibai cards, it would be a waste not to use them in various kinds of follow-up activities throughout the year. The stories only get better and more entertaining with practice, as students learn to juggle the telling of the story with the pacing of the pulling of the cards! Find opportunities for the students to perform for other classes or their families. If the content area is something that the school does on a yearly basis, it would be especially productive if they can have an opportunity to tell their stories to the younger students who might be doing a similar project the following year.
A valuable extension activity would be to have each student come up with his or her own written version of the kamishibai narrative they have developed as a group without the illustrated cards and without consulting each other. Do their stories come out the same? Do some retain the sound effects and dialogue and do others just use the narrator’s voice? How do they make up for the lack of illustrations in their writing? Are they able to retain the narrative tension? What would help them to do this in their writing? These kinds of questions will come up naturally in class discussion when they read each other’s narratives.
Summative Assessment:
Whenever I create kamishibai with students, we generate a group rubric, usually as a list of what we have learned. Here is an example of one of the lists I have generated with a class in the past:
Illustration strategies:
- Bold outlines/ Centered images
- Attention to direction of movement out of the stage
- Changing camera angles (i.e., zooming in and pulling back, showing the characters from the front, side, or back)
- Card pulling strategies: fast pulls (sudden transformations), slow transitions (“Meanwhile…”; “Three weeks later…”), half or partial card pulls
- Attention to story structure and narrative tension (suspense building to a climax, strong beginnings and strong endings)
- Narrative voice where appropriate
- Use of dialogue between/among characters with varying tone
- Characters’ thoughts (interior monologue)
- Use of sound effects
- Volume! Was it loud enough?
After each performance, we go through this list as a group to assess the students’ work and suggest ways to make improvements. Did they use any of the card-pulling or zooming in techniques to build suspense? Did the events of their story make sense and lead up to a climax? Can their illustrations be seen from a distance? Are their voices loud enough to be heard and do they vary their tone for different characters? This list can be used as a summative assessment to make sure that they have met all the expectations of an excellent kamishibai performance.
Other Sources:
The Kamishibai for Kids website offers a lot of great tips and background information under History, How to Use, Resources, and Spotlight at www.kamishibai.com (They also provide a teachers’ guide for each one of their stories)
Battino, David, and Hazuki Kataoka, of Leaf Moon Arts also offer tips about creating and performing kamishibai at www.storycardtheater.com.
There are many wonderful kamishibai stories, but not all of them are equal when it comes to teaching the mechanics of the form. Here are several I would recommend for this purpose:[7]
“The One-Inch Boy,” by Jōji Tsubota, illustrated by Hisai Suzuki
“Nya-on, the Kitten,” by Tsuyako Tomaru, illustrated by Kyōko Watanabe
“Momotaro, the Peach Boy,” by Miyoko Matsutani, illustrated by Eigorō Futamata
“Hats for the Jizos,” by Miyoko Matsutani, illustrated by Fumio Matsuyama
“The Goblin, the Water-Imp, and the Thundergod,” by Satoshi Kako, illustrated by Eigorō Futamata
“The Mouse’s Wedding,” by Seiichi Horiuchi, illustrated by Masao Kubo
Bibliography:
Hutchins, Pat. Rosie’s Walk. New York, Simon & Schuster, 1966.
McGowan, Tara. The Kamishibai Classroom: Engaging Multiple Literacies through the Art of ‘Paper Theater.’ California: ABC-CLIO Press, 2010.
---. Performing Kamishibai: An Emerging New Literacy for a Global Audience. New York: Routledge Press, 2015.
Nash, Eric. Manga kamishibai: The art of Japanese paper theater. New York: Abrams Comic Arts, 2009.
Say, Allen. Kamishibai Man. Boston, MA: Houghton-Mifflin, 2005.
[1] For more in depth discussions of all these points, see The Kamishibai Classroom: Engaging Multiple Literacies through the Art of ‘Paper Theater’ (2010) and Performing Kamishibai: An Emerging New Literacy for a Global Audience (forthcoming).
[2] Download the article “The Mechanics of Kamishibai through the Art of Eigorō Futamata,” http://www.kamishibai.com/resources.
[3] Other reading standards could be addressed in the course of this curriculum, depending on the content area the teacher is using with the kamishibai format.
[4] Again, I go into more detail with examples in the downloadable article, “The Mechanics of Kamishibai through the Art of Eigorō Futamata” and in The Kamishibai Classroom.
[5] Published kamishibai are usually 12 or 16 cards for the convenience of the publisher (just like picture-books are 36 or 48 pages). Very simple stories for young children can be as short as 8 cards. But hand-made kamishibai do not have to be any pre-determined length.
[6] For an example, see The Kamishibai Classroom, page 17, where I illustrate how to map out a story on big paper, using Kyōko Watanabe’s wonderful illustrations for the kamishibai story called “Nya-on, the Kitten.”
[7] All of these cards may be purchased through Kamishibai for Kids, at www.kamishibai.com.
